Showing posts with label Blogger-how-tos. Show all posts

BLOGGER SMASHER IS BACK WITH REASONABLE TIPS FOR YOU !

Hello friends! A big hug after all this vacation ( kind of) to all out there. These days were really boring and that the most hard part was to remain detached with my friends and buddies. Seems to me that in this short period most things have changed and I am very happy to see that most of my friends now have a blog more upgraded..

  As always today I am writing about some effective ways to earn money online and the best part is that it's free and quite easy. And most trusting fact is that they are not FAKE! at all. So shall we begin;

  • Create a blog;
The first step of it is a creation of blog. I see that most of you have already completed this step. But the key for it's proper completion is to remain sticked with it. The money your blog can make out is determined by your will. If that will ever weakens then soon the pillars of your blog ruins. SO no matter what happens stay sticked with your blog and before you even know, your blog will start to pay you off.
  • Stay Original;
The main theme of this step is to remain yourself always when you operate your blog. Never copy what others write and say. Using your capability you can create new things even if you share the same topic. The foundation may be same but the concepts of the building must be yours, i.e. original. If you copy of others you will not have the true enjoyment of what blogging truly is and you'll start to fade away from the blogosphere.
  • Raise yourself among people;
People who are crawling in the internet are the main source of every bit of penny you make online. So you should definitely have a good name amongst the public. You should always gain more followers. So stay tuned in many forums and communities and stay in touch with your visitors. And once you have gained your followers you will have your blog famed. Thus you will be receiving plenty of traffic.
  • Advertise & Sponsor;
Advertising your site falls in the best time after you complete the above steps. After you get traffic you should advertise your site. Advertising is the best way to earn money after all. Be sure you put decorative advertisements and be cautious about the colour and size of ads. It will attract more people.
  • Never leave working hard;
You might be able to advertise and earn money but be awared, if you start to become clumsy you will be soon facing trouble. I mean you may be earning low and your visitors might be sucked down just by clicking your ads. So friends mark my words and never leave working hard. See you next time..

How Blogging Reduces Depression And Anxiety

For the most of our lives, running after money or getting stuck through some unsuccessful business
activities, and regarding teenagers, the feeling of betrayal as well as being alone and solitary has led us to struggle with depression and anxiety. 
Depression has no boundaries. No matter how rich you are, no matter how successful you've been, but if you're thrown in your own dark thoughts, there's no easy escape. This is the reason why, even celebrities have battled depression. Celebrities like Jim Carrey, Ellen Degeneres, Johnny Depp as well as others were successful in fighting over depression but sadly some celebrities couldn't make it through which includes famous music icons like Chris Cornell, Chester Bennington and Kurt Cobain.
Regarding me, I've been totally open about my depressive phase where I dealt with tons of emotional disturbance including sadness, anger, jealousy as well as guilt. There were various times in my life, where I nearly gave up, but still couldn't end it. That was really a dark phase where the unnecessary thoughts were killing me and I felt like no one was totally feeling me.
But now, the old thoughts are long gone. I'm happy and progressive towards my profession, right now. The major thing that helped me battle over my depression was blogging. Yeah, it's true that writing blog posts eventually led me to overcome my depressive phase. 
You might wonder, how can writing blog posts help in curing depression? 
Well, here are the reasons behind it :

  • Presenting our views
The major aspect of blogging is that we can totally present our views and thoughts. No matter what the post is about, giving our total views and recommendation helps in boosting our knowledge as well. With our creative expression, we can easily give our views on a particular matter which the post is about, that eventually leads in making us feel good, which reduces sadness and anger.

  • Sharing information to others
The posts that we present in our particular blog is meant to be for others to read. Depending on the post quality, the readers might be inspired or motivated by our writings. They'll start giving their own views or asking you some sort of questions which will eventually make us more happy because of the engagement seen on the post and the attention that our readers are providing to you. This becomes an inspiration for us to even write and deliver more posts, which will make us busy rather than being alone and drowned into thoughts.

  • Boosts our confidence
Now that we have started writing contents focusing on our views and knowledge, the level of engagement in the posts helps in giving us more confidence about how it has also helped others. This removes negative vibes like sadness and mood swings from our mind and helps in better understanding of our worth in life. This becomes an important aspect of how important we're for everyone, leading us to reduce major thoughts which once pulled us from a happy life and led us into dark phase of depression.

Depression isn't an easy escape. Being a victim of depression once, I just want to tell you that you're not alone. There are many people who're battling through this phase. This can be cured through healthy expressions, emotions and total support but the major thing that helps in curing it is belief upon you.
You guys are awesome and this world is such a beautiful place for us to live. Our life is totally bigger than what we might expect, because of unexpected things to come in future. If you're having any problems regarding depression and how you're dealing or how you dealt, comment down your thoughts below. I'll be responding all of your comments. This isn't just a blog, it's a community and we're like a family.
Regards,
Blogger Smasher

Increase Your Blog's Alexa Ranking

Alexa, definitely you have heard the name before has now come to first position in ranking system. Almost every one having a blog or a website want's higher rank. For this they spend hours and pay high amount of money to boost their ranking. The paid traffic may boost your ranking but infact later on it will decrease rapidly.
The only reason for boosting alexa rank is because it matters for everyone website. People choose to select the website for different purposes viewing their alexa rank. The lower the number is the larger it is popular. According to alexa rank google ranks first, facebook second, youtube third and so on. These sites get thousands of unique pageviews daily so they rank first, second and third. But some sites do get thousand pageviews but their ranking isn't good. So for those people whose alexa ranking isn't improving, here are some tips. These tips comes from my experience and believe it really works.
So here we go:
  • Traffic
The most important thing for boosting alexa rank is traffic. Without traffic if you implemented other steps also then your site cannot improve. So try getting more and more traffic. The best traffic is the organic traffic that comes from search engines, probably more from google. So index your pages on google very fast. Don't buy traffic and if you wish also then buy unique one !

  • Alexa Widgets
Alexa provides number of widgets related to traffic rank. Install any one of those in your site. You can see a live example of it in my blog also. You might ask how it will help to boost rank as it doesn't bring visitors. But believe me it helps to connect your site to alexa and provide good ranks. You also can see most of the webmaster have this widget. It is because they also will to boost their rank.
  • Alexa Toolbar
The most important feature of alexa ranking is that it provide rank according to the number of toolbar available. Before some months i also used to think that it does nothing but before some weeks i found great results. It really matters. So, inform your readers about toolbar. Do the starting of it by downloading it yourself.
  • Claim/ Review your site
As soon as you start your site sign up for alexa and claim your site. Claiming your site gives more control over your site. If you can then you can certify your site. After certifying your site metrics your ranking will be increasing. Fill up all the information of your site, information, country, region,etc. Fill up all the info. Ask your visitors, friends, relatives, pal, etc to review your site. Reviewing your site makes it to make it closer to Alexa. be sure that they review good not bad.
  • Update your site 
It's strictly recommend that you update your site regularly. Keep on posting articles that are unique and are likely to get impressions. Get more backlinks and comments. Updating your site bounds alexa to rank your site.

So these were the tips that i could give. Hope that your alexa ranking will be good. Implement now as it takes lots of time. No matter how much traffic you get ranking good in alexa takes a long time. So it's better to start your journey from now on.
Thank you !

Read Our Other Useful Posts;

Adding Special Effects in Blog Images

Masking is a brilliant way to make a picture of any type look more attractive. It ultimately became a favorite technique of me as I knew how to mask a image for the first time in photoshop. After a long journey in Adobe Photoshop, I came to blogger and I desired to mask a image in blogger too.
But for the few days I couldn't, but as the day passed on, I ultimately knew how to mask the picture easily in a blogger blog.
Being an excellent designer our job is to provide the best quality things, and mask technique also falls in it. I know that many of you guys may already know about it, but still wide range of bloggers fall in the group who are not aware of it. So i came up with this post.
 But before see a LIVE DEMO of masking a image:

So what is your remarks for this. Probably the masked image is better than that of real image. So what are you waiting for. Lets know how to do it:
  • Go to dashboard>template>template designer.
  • Add the below CSS code in your blog.
.maskeffect { -webkit-mask-image: -webkit-gradient(radial, center center, 0, center center, 350, from(rgba(0,0,0,3)), to(rgba(0,0,0,0))); }
  • Apply to Blog and save it !
Now, it's turn to mask the pictures. For masking any pictures, just use these below codes;
<div class="maskeffect">
<img src="imageurl">
</div>
Replace "image url" with your image URL which you want to be masked.
Thanks for taking your time to read this post ! If you're having any difficulties regarding masking your blogger image, simply comment down below !
Thank you,
Blogger Smasher

Read Our Other Useful Posts;

Adding games in your Blog Posts


Who won't like a game in this present time. Probably all will surely like it. People of very large range like games due to it's vast scope. Games can be for entertainment or for education.


But the most interesting is that we can add games in Blogger too. Imagine blogger & Game, what a great combination ya. Today this tutorial will help you to add the Online games in Blogger. This is Just really awesome Tutorial. Remember never keep a copyrighted game. They may claim their game and force to remove that post. So you may be in loss to. It's a simple guide. Lets Do it.

MAKING AN ONLINE GAME

If you can make a small game, create it. But if you cannot you can try this;

  • Go to Google Search. 
  • In Search box type “Embed Games”.
  • A list of URL will come. 
  • Go to any of the URL. 
  • Find the Embed code and copy it to notepad or other plain text editor.


Remember embed code usually look like this:
<embed height="500" menu="false" pluginspage="http://www.macromedia.com/go/getflashplayer" quality="high" src="http://embedgames.ru/wp-content/games/hidden-valentine-hearts.swf" type="application/x-shockwave-flash" width="700"></embed>
In width and height you can keep yourself, which suits your taste.

  • If you want to host game file in your own sever then download embed games file with extension(.swf) and add it to server.
ADDING YOUR EMBED GAMES:

  • Create a new post
  • Switch back to HTML Mode
  • Add the copied embed code to the code window
  • Enjoy the game !
Thank you for taking your time to read this post !
Regards,
Blogger Smasher


Read Our Other Useful Posts;

Instant Traffic Boosting Tips

Google Search HistoryMany blog lacks traffic that there content desires. Creating blog is easy but its hard to get organic traffic and visitors. Lets talk of Blogger Smasher. For first three month my blog hardly got less than 200 visitor daily but see my blog popularity has grown that my blog get more than 500 unique page views. Lets learn some key point to increase traffic !

Publishing High Quality content

Every body likes the exclusive content. Your content must target what your Visitor want. You need to publish only genuine content which can make audience happy that surely increase your page view. It's generally good to publish about 3 articles in a week and a unique post in a month.

By Advertising

Advertising is probably the the best way to increase traffic. For first three month it is better to advertise using Google Adwords. Just it is matter of money. After advertising you will see your blog level and cost goes high that you will never expect. For eg: if you spent $100 for your advertisement and even many of clicks are fake than also you can make profit, than also it is guaranteed that you will have your sales boosted as the same $100 comes in your hand like a boomerang with the net cost of $200 and even more.


Participation in Forum

If you arise question or help other in Forum you will certainly get some Traffic. Thousands of people visit Forum then there is high possibility of Getting more Traffic. For Blogger it is better to participate in Blogger Help forum.

Reducing Page Size

If you reduce your Blog size then people will probably stay longer. A Blog that loads faster touch the heart of Visitor. Generally people recommend your site as valid if your site loads faster and they will be as referrals delivering you large amount of traffic.

Making SEO Friendly 

Blog Blogger Smasher gets 70% of traffic form Search Engines. From this you can know the eseentiality of SEO. To make SEO Friendly you must use alternate tags in image. You must also use nofollow, Titles etc. to your Link. Adding Meta tags helps in contribution of SEO.

Connecting the Blog with Social Media

Social Media helps to diversify your content. If you want to increase traffic social media has got high role. Blogging Sentral Gets 15% Traffic from Social media like Facebook, Google plus. To promote social media you need to make Facebook, Google + fanpages and upgrade and share your articles in them.

Using Google Analytic, Stat Counter

At first we need to identify the Traffic Source of Blog. Blogger Stat is not effective so use Google Analytic and Stat Counter. You can get detailed information of your current traffic and use those traffic bases as a technique to boost your traffic.

Image,Video Blogging

Adding Image and video helps to increase SEO in Google image and Google video and YouTube. Thus You can create may traffic source from it. Needless to say, youtube and google videos can instantly send you thousands of traffic.

Posting content regularly

If you Post your Content Regularly 2-3 times in a day your visitor will stay longer with your Blog. This surely increase your Blog Traffic. It may not be possible for some bloggers, but I request them to post a content in a day.

Pinging Blog

Ping the Blog using ping-o-matic. Don’t use it beyond limit other wise you will get banned from search engine. You can use window live writer for pinging too.

I am sure that these tips would help you.
If you know other tips also then you can comment below? We are waiting for your comments!!

Awesome Social Media sharing widget for Blogger

;

We have seen different social media widgets in most of the blogs. A blog without social media is an incomplete blog. For making a blog complete and more advanced, social media is highly required. So, in this post, we will be discussing on adding social media widget for blogger. In this post, we will be discussing on Adding OS X Styled Sharing Widget For blogger. Have you ever used MAC OS X. If you have used, you may find a Desk Like Thing where all apps are placed and when we hover on it, it starts to move. The Widget is same like that.
For Live Demo, you can click below Link:
LIVE DEMO
Or you can watch the picture on the right side.
Now Let's Add This. Follow My Steps To Add This:

  • Go To Blogger Dashboard
  • Click On Layout
  • Click On Add A Gadget
  • Select HTML/JAVASCRIPT
  • Copy and paste the given codes there
<!-- bloggercruzer.blogspot.com !-->
<style type="text/css">
  #sharedock { position: fixed; bottom: 0; left: 0; width: 100%; height: 90px; z-index: 999; }
  #dock { position: relative; bottom: 0; font: 13px "Trebuchet MS", Verdana, Helvetica, sans-serif; }
  .dock-container { position: relative; background:url(https://blogger.googleusercontent.com/img/b/R29vZ2xl/AVvXsEhSuXXngVBWcosYMVcczxm58VVmkYGIctOT7utyI4QIgqwyWVjBlUxNEt64zlDGnueQlVwISX7pq_enAu5Q6DpeeyWxY8lvTA8kQX1KPsU0uUrzAJkq7ezc_fNGoiMAdHQ4O4SkaxtLwDn-/s1600/bloggertrix1.gif) no-repeat bottom center; height: 50px; padding: 20px 0 20px 0; }
  .dock-container .custom_images a { display: block;  position: absolute; bottom: 0; text-align: center; text-decoration: none; color: #333; cursor: pointer; }
  .dock-container .custom_images span { background: rgba(0,0,0,.75); display: none; padding: 2px 8px; margin-left: 17px; font-size: 11px; color: #fff; -moz-border-radius: 10px; -webkit-border-radius: 10px; }
  .dock-container .custom_images img { border: 0; margin: 5px 0px 10px 0px; width: 100%; }
  </style>

<div id="sharedock">
  <div id="dock">
  <div class="dock-container">

<div class="addthis_toolbox"> 

 <div class="custom_images">

 <a class="addthis_button_facebook"><span>Facebook</span><img src="http://addthis.com/cms-content/images/gallery/aquaticus_facebook.png" alt="Share to Facebook" /></a>
  <a class="addthis_button_twitter"><span>Twitter</span><img src="http://addthis.com/cms-content/images/gallery/aquaticus_twitter.png" alt="Share to Twitter" /></a>
<a class="addthis_button_myspace"><span>MySpace</span><img src="http://addthis.com/cms-content/images/gallery/aquaticus_myspace.png" alt="Share to MySpace" /></a>
<a class="addthis_button_stumbleupon"><span>Stumble</span><img src="http://addthis.com/cms-content/images/gallery/aquaticus_stumbleupon.png" alt="Stumble It" /></a>
<a class="addthis_button_reddit"><span>Reddit</span><img src="http://addthis.com/cms-content/images/gallery/aquaticus_reddit.png" alt="Share to Reddit" /></a>
<a class="addthis_button_delicious"><span>Delicious</span><img src="http://addthis.com/cms-content/images/gallery/aquaticus_delicious.png" alt="Share to Delicious" /></a>
  <a class="addthis_button_more"><span>More...</span><img src="http://addthis.com/cms-content/images/gallery/addthis_64.png" alt="More..." /></a>
  </div>
  </div> 
  </div>
  </div>
  </div>

  <script type="text/javascript" src="http://s7.addthis.com/js/250/addthis_widget.js"></script>
  <script type="text/javascript" src="http://ajax.googleapis.com/ajax/libs/jquery/1.3.2/jquery.min.js"></script>
  <script type="text/javascript" src="http://addthis.com//cms-content/images/gallery/fisheye-iutil.min.js"></script>
  <script type="text/javascript">
  $(function () { 
  // Dock initialize
  $('#dock').Fisheye(
  {
  maxWidth: 30,
  items: 'a',
  itemsText: 'span',
  container: '.dock-container',
  itemWidth: 50,
  proximity: 60,
  alignment : 'left',
  valign: 'bottom',
  halign : 'center'
  }
  );
  });
  </script>
  • Save The Gadget
  • Save The Template
  • Check Your Blog
All Done. If you have any problems regarding this, Comment and I Shall be Helping You.
Happy Blogging !

How To Add New Fonts in Blogger

Google web fontsWondering how to use Google Web Font in  Blogger. You may not wonder if you use Blogger
 Default Template as we can browse several font using Template Designer. But What if you are using Layout Template. You need to change your blogger posts fonts to make it more attractive. Ya, there is way to use Google Font by embedding it. 

To use Google Font kindly follow these below steps;

  • Go To This Link
  • Select You Font that you wish to add it .
  • Click on quick use. You can see the codes like this;
Google font

  • Inside it, you can see code similar to this;
<link href='http://fonts.googleapis.com/css?family=Great+Vibes' rel='stylesheet' type='text/css'>
  • Now, add / just after 'text/css'. Now, your code will be similar to this 
<link href='http://fonts.googleapis.com/css?family=Great+Vibes' rel='stylesheet' type='text/css'/>
  •  Go To Blogger Dashboard
  • Click on template and select Edit HTML
  • Now, just above </head>, add those codes
  • Search for this code using CTRL + F: ]]></b:skin> 
  • Now, in Google Fonts tab, scroll to Intregate Your Fonts To CSS and copy the codes given there. As an example, I will copy these codes;
font-family: 'Great Vibes', cursive;
  •  Now, you must paste these codes where you want to use it. For an example, If you want to use as your sidebar title, you must find sidebar h2 and add your code inside {YOUR CODES}. L Have a look at an example of it;
.sidebar h2 { font-family: 'Great Vibes', cursive; }
  • Save Your Template 
If you have any confusions, you can comment below and I will try my best to solve your problem. Till then goodbye everyone!

How To Earn Money From Blogging


Hello friends!How are you all? We have met after all these long days. These days were really boring
and that the most hard part was to remain detached with my friends, buddies and my loyal blog visitors. Seems to me that in this short period of time, most things have changed to you guys and I am very happy to see that most of my friends now have a blog more upgraded and maintained. As always, today I am writing some interesting thing, i.e: about some effective ways to earn money online and the best part is that it's free and quite easy. And most trusting and reliable fact is that they are not FAKE at all! Thy are 100% real and can grant our face with a big smile! So, let's begin this topic:  
  • Creating a blog
The first step of earning is the creation of a informative blog. I see that most of you have already completed this step. But the key factor for it's proper completion and maintenance is to remain sticked with it. The money your blog can make out is determined by your will. If that will ever weakens then soon the pillars of your blog ruins. So no matter what happens stay sticked with your blog and before you even know, your blog will start to pay you off. If you are getting less pageviews also, never stop posting and updating your blog! 
    • Staying Original
    The main aim of this step is to preserve and promote your originality. Never copy what others write and say. Using your capability and logic, you can create new things even if you share the same topic with same title. The foundation may be same but the concepts of the building must be yours, i.e. original. If you copy what others write, you will not have the true enjoyment of what blogging truly is and you'll start to fade away from the blogosphere and that's too bad for you and your visitors. 
      • Being Friendly with the visitors
      People who are crawling and searching in the internet are the main source of every bit of coins that you make online. So you should definitely have a good name amongst the public. You should always gain more followers. So stay tuned in many forums and communities and stay in touch with your visitors and reply every comments and help your visitors, so that they can trust you. And once you have gained your followers you will have your blog famed. Thus you will be receiving plenty of traffic. 
      • Advertising & Sponsor
      Advertising your site falls in the best time after you complete the above steps. After you get more traffic you should advertise your site. Advertising is the best way to earn money after all. Be sure you put decorative advertisements and be noticed about the color and the size of ads. It will attract more visitors. 
        • Never leave working hard
        You might be able to advertise and earn money but be awared, if you start to become clumsy, you will be soon facing trouble. I mean you may be earning low and your visitors might be sucked down just by clicking your ads. So friends mark my words and never leave working hard. See you next time.. Till then bye, have a good day!
          Conclusion;
          Be sure you always respect your visitors. And be sure to give credits to helpers who helped you and never violate the laws. And the most irrational thing is the copy work. Never try to copy what others write. If you copy others and paste in your blog, then I am requesting you to delete your blog because blogging doesn't means copying and that thing would be a complete nuisance.
          Blogging requires hard work and lot's of time. Everything you desire doesn't happens the way it really is. Remember that you are just a newbie among the other billions experts. So the only way for you to succeed is to write quality contents. Mark my words and in short time you will surely start earning from your blog! And from that day, You'll never stop blogging.
          The Blogger Smasher Team'd try it's best to provide all sorts of tricks related to earning from blog. And, we'll pray for your success. too!

          Adding Social Content Locker in Blogger

          Hi guys, today I am bringing you the most fantastic Widget which helps to increase our Blogs traffic By Sharing. It Is Called Social Content Locker which helps to share our blog to unlock the content. You may have seen related to this content locker in different surveying sites where we must share the page to view hidden text, downloads and much more.
          So, lets add this special widget in our blog.

          Follow My Steps to add it in your blog;

          • Open your blog account
          • Go To Blogger Dashboard
          • Select Your Blog and click On Layout
          • Click On Template and select Edit HTML 
          • Search For This Code </head>
          • paste the below code just below the code
          <link href='https://drive.google.com/file/d/0B6h45U6VDP-abXFiYWZPZlVoeTA' rel='stylesheet' type='text/css'/>
          

          • Now, save your template
          Now, let's add this in our desired post. Follow my steps to show it in our specified posts;

          • Click On The Blog post where you want to add this
          • Click On Edit post
          • Select HTML in place Of Compose button
          • Paste The Code There

          <article id="default-usage">
          <div class="to-lock" style="display: none;">
          <!--Hidden Content Starts (You can Use HTML BELOW)--> <div style="text-align: center; margin-bottom: 20px;"> <img src="Add_Hidden_Image_Here" alt="" style="margin: auto;" /> </div>
          Add Your Hidden Text Here
          <div style="text-align: justify"> </div> <!--Hidden Content Ends (You can Use HTML ABOVE)-->
          </article>
          </div><div id="nbtunlocker"> </div>
          <script type="text/javascript" src="https://drive.google.com/file/d/0B6h45U6VDP-acDRPeDFFeXRCRE0"></script>
          <script> jQuery(document).ready(function ($) { $("#default-usage .to-lock").socialLock({ text: { message: "Yes, this is Social Locker. Just try it, click on one of buttons." header: "Share it To Unlock This Content", }, style: "ui-social-locker-secrets", buttons: { order: ["twitter", "facebook", "google"] },
          url: "http://www.twitter.com/bloggersmasher",
          // twitter options twitter: { text: "Upgrade your social buttons to get more social traffic!" url: "http://www.facebook.com/bloggersmasher", }, // facebook options facebook: { appId: "408184442589211" url: "bloggersmasher.blogspot.com" }, google: { } });
          });;;;
          </script>
          • Now, Change The Following Highlighted Lines:
          Change Add_Hidden_Image_Here with Your Hidden Image
          Change Add Your Hidden Text Here with your hidden Text
          Change bloggersmasher with your Twitter Username
          Change bloggersmasher with your Facebook page Link
          Change bloggersmasher.blogspot.com with Your Google plus Username

          • At Last, publish The post
          Now, we've successfully added social content locker in our blog. If You Have any kind of problems, you can comment and I shall Help You. 
          Happy Blogging!!!
          Regards,
          Nischal Khanal

          Adding Attractive Navigation Bar For Blogger


          A navigation menu is highly required organize your blog labels, or to add a menu button for a new Blogger page, or to link to another page on the web. This can be done using some basic HTML and CSS. Before 2 years, our previous admin Mr. Ajaya Gajurel wrote a post on "Creating Custom Navigation Bar for Blogger". You can see it here. So, I'm not going to describe more about it. Just I will be telling you that they will work as a buttons for bloggers. When we click on any of them, it redirects to the specified URL of it.

          Follow My Steps on Adding Custom Navigation Bar;

          • Go To Blogger Dashboard
          • Click On Add A Gadget Just Below Your Blogger Header (Because We will be showing it in the top of our blog)
          • Click On HTML/Javascript 
          • Paste The Below Code there;
           <div id="tabs24">  
                <ul>  
                     <li><a href="1st link" title="Smasher Menu"><span>Home</span></a></li>  
                     <li><a href="2nd Link" title="Smasher Menu" class="current"><span>About Us</span></a></li>  
                     <li><a href="3rd link" title="Smasher Menu"><span>Services</span></a></li>  
                     <li><a href="4th Link" title="Smasher Menu"><span>Our Work</span></a></li>  
                     <li><a href="5th link" title="Smasher Menu"><span>Contact Us</span></a></li>  
                </ul>  
           </div>  


          • Change 1st Link, 2nd Link, 3rd Link, etc with your respective links.
          • Change Home, About Us, Services, Our Work, Contact us, etc with the text to appear in the button.
          • Save it!
          Now, we have added the links. But it is incomplete and looks very very simple. Now, let's stylize the bar. Follow My Steps To Stylize the navigation bar;
          • Go To Blogger Dashboard And Select Template And Click On Edit HTML
          • Then Search for This Code inside the HTML Codes: ]]></b:skin>
          • Now Just Paste This below code before/above ]]></b:skin>
           /* ---------------------- Start Smasher Navigation Bar ---------------------- */  
           #tabs24{position:relative;height:43px;font-size:14px;text-transform:uppercase;background:#fff url("images/time4bed_bg.gif") repeat-x bottom left;font-family:Georgia, "Times New Roman", Times, serif;}  
           #tabs24 ul{margin:0;padding:0;list-style-type:none;width:auto;float:left;}  
           #tabs24 ul li{display:block;float:left;margin:0 2px;}  
           #tabs24 ul li a{display:block;float:left;color:#ffdab6;text-decoration:none;padding:0 0 0 25px;height:43px;line-height:50px;}  
           #tabs24 ul li a span{display:block;float:left;padding:0 25px 0 0;height:31px;width:auto;}  
           #tabs24 ul li a:hover{color:#fff;}  
           #tabs24 ul li a:hover span{display:block;cursor:pointer;}  
           #tabs24 ul li a.current,#tabs24 ul li a.current:hover{color:#894d12;background:transparent url("images/time2bed_left-ON.gif") no-repeat top left;}  
           #tabs24 ul li a.current span{background:transparent url("images/time2bed_right-ON.gif") no-repeat top right;height:43px;}  
           /* ---------------------- END Smasher Navigation Bar ---------------------- */  
          

          • Save Your Template
          • Check Your blog
          Now, we have made a custom navigation bar for blogger. The final work in your blog looks similar to this;
          If you guys have any problems regarding this topic, you can comment below;
          Regards,

          Add Beautiful E-mail Subscription Box For Blogger


          Sometimes, our reliable visitors may not be able to view our blog posts. So, they'd like to subscribe via RSS.  Each of the visitor subscribed by RSS would be updated immediately after updating the site. So, it is preety much cool. Visitors will be e-mailed automatically after the update of the website.
          But, many of the users have the default blogger Feedburner E-mail Subscription Box which doesn't look preety and attractive. So, in this tutorial, We've brought you guys a beautiful e-mail subscription box for blogger.
          So, let's get started;

          Add Stylish E-mail Subscription Box For Blogger;

          • Go To Blogger Dashboard and select your blog
          • Click On Layout And Select Add A Gadget(Recommended To Add It On Footer)
          • Then Choose HTML/Javascript
          • Paste the Below Code There;
           <div id='footer-newsletter-wrap'>   
           <div id='footer-newsletter'>   
           <h2 class='title'>Subscribe to our newsletter<span style='color:#f54000;'>.</span></h2> <span>(Get fresh updates in your inbox. Unsubscribe at anytime)</span>  
            <div class='newsletter-inner'>   
           <form action='http://feedburner.google.com/fb/a/mailverify' method='post' onsubmit='window.open("http://feedburner.google.com/fb/a/mailverify?uri=bloggersmasher", "popupwindow", "scrollbars=yes,width=550,height=520"); return true' target='popupwindow'> <table> <tr> <td width='100%'> <input class='newsletter-address' name='email' placeholder='Your Email Address' type='text'/> </td> <td> <input class='newsletter-submit' type='submit' value='Subscribe'/>   
           </td>  
           </tr>   
           </table>  
            <input name='uri' type='hidden' value='newbloggerlab'/>   
           <input name='loc' type='hidden' value='en_US'/> </form>   
           </div> </div> </div>   
           <style> .newsletter-inner { margin-top:15px; } .newsletter-inner .newsletter-address{ color:#fff !important; width:100%; font-size:16px; border:0; background-color:#2B4052; padding:20px 0px 20px 25px; border-radius: 0px; -moz-border-radius:0px; -webkit-border-radius:0px; } .newsletter-inner .newsletter-submit{ width:100%; margin:0px 0px 0px 29px; border:0; background:#a3d14f !important; color:#1E2D3A; font-size:16px; z-index:0 border-radius: 0px; -moz-border-radius:0px; -webkit-border-radius:0px; font-weight:bold; padding:20px 20px 20px 20px; } .newsletter-inner .newsletter-submit:hover{ background:#93bc47 !important; } .grid a, .grid a:visited {color:#eeeeee} .grid a:visited {text-decoration:underline} .grid a:hover {color:#cccccc} #footer-newsletter-wrap { background:#1E2D3A; margin: 0 0 0 0; padding: 50px 0 60px 0; } #footer-newsletter-wrap a { color:#66665f; } #footer-newsletter { color:#5b5b5e; width: 520px; margin: 0 auto; } #footer-newsletter h2 { margin: 0px 0 10px 0; padding: 0; border-bottom: none; font-weight: bold; text-transform: none; color: #fff; font-size: 26px; text-shadow:2px 2px #151f28; } #footer-newsletter ::-webkit-input-placeholder { color: #fff; } </style>  
          

          • Change Bloggesmasher with your Feedbuner URL
          • Save Your Layout
          • Done!
          Now, we have successfully added stylish E-mail Subscription Box. If you have any problems, you can ask us below.
          Regards,
          Nischal Khanal

          How To Create A Stylish Contact Form For Blogger


          Visitors may need to contact the blog administrators for some reasons or for requesting something and many other reasons. Many visitor may have some difficulties in contacting the author. For an example, if the users don't mention their e-mail address or if they don't have contact form. Sometimes it becomes a great need to contact an author, and if there are no any sufficient measures for it readers may get disappointed and leave visiting the specific blog.
          So, in this video tutorial, we will be discussing on creating the contact form. You guys just need to follow my easy tutorials.
          So, let's get Started;

          • Go To This Link(Opens In New Tab)
          • Go Through Sign-Up
          • In it's Dashboard, you'd see many options like this;


          • Click On Contact Form Box.
          • In the form name, type the title of your contact form and click on "OK"
          • Then, you can see the layout of the form. Just make it as you like.
          • After customizing the layout, click on Continue Button
          • Select Blogger (Since We Are Using Blogger Platform)
          • Then Copy The Codes
          • Open Your Blogger Dashboard And Select Your Blog
          • Click On Page And create A New Page
          • Switch To HTML From Compose Button
          • Paste The Code and give a suitable title.
          • At last, click on publish post.
          Now, we have added contact form fr our blog. If you guys have any problems, you can ask any questions.
          Read Our Other Useful Posts;
          Nischal Khanal(Author)

          Remove Powered By Blogger Attribution From Blogger


          Hello guys, It's Nischal Again and today i'm going to show you how to remove powered by blogger attribution permanently from your blog.
          Before many moments, I had written a post on removing the footer credit links from blogger templates. You can read that post here
          Now, in this post, we will be discussing how to remove Powered By Blogger attribution from our blogger templates.
          This attribution automatically comes if you upload a custom template for blogger and it looks too ugly. So, many bloggers are complaining this gadget to be removed.
          I received a mail from an author about the way to remove the powered by blogger attribution. So, I shared this trick with you guys.
          Follow my easy steps to get rid of this ugly gadget.

          Steps to remove this attribution;

          • Go To Blogger Dashboard
          • Click On Template
          • Click On Edit HTML
          • Click Anywhere inside and Search For This Code using CTRL + F 
          • Now, just before it, add this code;
          • <style>
            #Attribution1 {
            display: none;
            </style>
          • Save Your Template
          • You are Done
          Now, you will completely get rid of that ugly attribution. If you guys have any problems, comment and I shall be helping you.

          Remove Footer Credit Links From Any Blogger Templates

          Hello guys, I'm back again. I was busy somewhere else due to my studies so, I couldn't post for a long... 
          Umm... Never Mind. Today, we will be discussing on removing credit links from blogger. 
          Most of the default blogger templates looks ugly. So, most of us use custom blogger templates but there is a problem; the template creator writes their credit links in footer of blog. This makes us to be more rude. The blog is ours but the template creator writes their name in credits. 
          So today, I will reveal you the ways to remove the footer credit links from blogger. 
          You can see the picture of  our blogger footer credit below;


          Now, Let's Remove this ugly credit links;

          • Go To Blogger Dashboard >> Template >> Edit HTML
          • Click anywhere and Search For Designed By Using CTRL + F, If you can't find Designed By keyword, search For Template By Or similar word
          • You can see the following codes there;

          • Now, Just Before Designed By letter, copy and paste this code; <div style="visibility:hidden"> and at last, </div> after </a> like The Given Picture;

          • The Code should Be Like This;
          <div style="visibility:hidden">Copyright (c) 2012 <a href="http://www.bloggingsentral.blogspot.com/" target="_blank" title="Blogger Templates">Blogging Sentral</a> by<a href="http://www.bloggingsentral.blogspot.com/" target="_blank" title="Blogger Templates"> Martin Gajurel</a></div>

          • Save The Template
          • You Are Done
          If you have any queries then you can ask us via comments.
          If you guys couldn't remove credits from any templates, you can send that template to;
          nischalkhanal123@gmail.com

          And I will remove credit links from there and will provide the template to you guys!

          Happy Blogging!!!

          How To Change Blogger Posts Permalink


          ;
          Hi guys, It's me again and today we will be discussing on changing the permalink of blogger. Blogger itself has different built in facilities. And Permalink is also one of the facilities of blogger. You will be imagining what is permalink. Don't worry, I will tell you.

          Permalink

          Permalink, a short name of permanent link is the URL Of different webpages and websites.

          In this tutorial, we will be changing permalink of blogger posts. We can change it with some easy and few steps.

          Steps of changing Blogger Permalink;

          • Go o Blogger Dashboard
          • Create A New Post And Write Post Title At First
          • Write all the things that you need to write
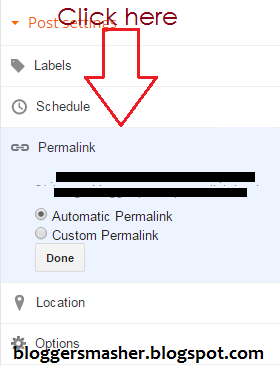
          • Finally, navigate to post setting and click on permalink as in the below picture;

          • Click On Custom Permalink
          • Write A Unique URL that you like
          • Finally Publish The Post
          • You Are Done
          Hurray, we have changed our blogger post permalink. If you guys have any problems related to this, comment and I shall help You. Stay tuned For New Blogger Tricks
          Happy Blogging!!!

          Add 360 Degree Rotating Effect In Any Blogger Images


          Hi guys, It's Nischal Khanal, new admin of Blogger Smasher. Our previous admin Mr. Ajaya Gajurel has posted about importance of images in blogger posts before 2 years. Really, image is very important in blogosphere. The things that we cant describe can be described by images. So, Leonardo Da Vinci also considered image as a worth thousands of words.
          Lets come to our point guys, today we shall be discussing how to rotate image up to 360 Degrees when we hover our mouse upon it.
          For a live demo, you can hover your mouse to this below picture of Neymar Jr. When you guys hover your mouse up to it, it rotates up to 360 Degrees.
          Now, let's add this effect in our blog. Follow my steps to add it in your blog;
          • Go To Blogger Dashboard
          • Select Your Blog
          • Click On Template
          • Click On Edit HTML
          • Search For This Code: ]]></b:skin> Using CTRL + F
          • Paste The Following Code Just Above ]]></b:skin>

          .smasherimg {
          opacity:
          0.6;
          border:3px solid #808080;
          margin-left: 0px;
          -o-transition: all 0.6s ease-out;
          -moz-transition: all 0.6s ease-out;
          -ms-transition: all 0.6s ease-out;
          -webkit-transition: all 0.6s ease-out;
          zoom: 1;
          }
          .smasherimg:hover {
          -moz-transform:rotate(360deg);
          opacity: 1;
          border:
          5px solid #D70E3C;
          -o-transform:rotate(360deg);
          transform: rotate(360deg);
          -webkit-transform:rotate(360deg);
          -ms-transform:rotate(360deg);
          zoom: 1;
          }
          Customizations
          • Change #D70E3C to your desired border color
          • Change 5px to your desired border size
          • If You want to make the image totally opaque, change 0.6 To 1 in opacity 
          • Save Your Template
          For Rotating Images Of Whole Blog;
          Guys, if you want to make all the images to rotate of your blog, follow my steps. Or if you want to rotate only specific pictures, skip these steps
          Steps to rotate all images of blogger posts;
          • Change .smasherpic with .post img
          • Save The Template

          Now, the effect will be saved in your template. But, for rotating it in specific images of blogger posts, you must paste a code in every images. It isn't much hard as it sounds.
          Follow my steps to rotate specific images in blogger posts;
          • Create A New post
          • Write all the informations that you need to post
          • Upload Images that you need to hover
          • Open the post editor from HTML Mode
          • Just before your image Tag, paste the following code;
          <div class="rotate">
          <img src="Your Image URL"/>
          </div>

          • Finally publish the post
          • You Are Done
          Now, when you hover the mouse over the image which you have made rotate, it will rotate up to 360 degrees. That's all guys, If you enjoyed this tutorial, be sure to share this posts. Stay tuned for different fantastic posts. Till Then, Good bye Guys!!
          Happy Blogging!!!

          Changing The Mouse Cursor

          Cursor is the most used thing to give input to computer. Each and every time our eyes are on it. So we can use that attraction for our benefit.
          By using a simple CSS code we can change the mouse cursor so whenever others view our blog they will get an attractive cursor instead of the default boring cursor. If you don't believe me, see the live demo of this trick in our test blog.

          So you wanna add this to your blog also. If so follow steps below;

          1. Get The Cursor;

          First of all before you can use your cursor you will need to get one. There are thousands of cursors available in the Internet. If you don't get it see these cursor hosting sites;
          Just select one of them and download it. Then host it in image hosting sites like Picasa, Flickr, google,etc. and get the direct link of your cursor. Once you get it you can move on to next step.

          2. Implementing The Cursor;

          After you got the direct link you can now implement it in your blog;
          • Go to dashboard>Template>Customize>Advanced>Add CSS.
          • Add the below CSS code to your blog.
          body, a, a:hover ,a:visited { cursor: url(YourCursorUrl), progress; }
          
          • In the above code change "YourCursorURL" with the direct link of the cursor you got in step 1.
          • Finally apply it and you are done.
          Now, visit your blog and you will find a totally amazing cursor in your blog.
          Enjoy!

          Troubleshoot:Cannot Delete My Gadget?

          Sometimes when you click on edit link on any gadget you don't get the delete button. You may feel quite uneasy when you won't see the delete button. Now, how to delete it? The same was that problems with people in forums too.

          So as a solution I am writing this post for all of you;
          When you don't get the delete button, it resembles that the gadget you are trying to delete is locked. You can find the locked widgets easily as locked widgets cannot be moved but other can. To delete the locked gadget follow below;

          Deleting The Locked Widget;

          • Go to Dashboard>Template>Edit HTML.
          • In your template code search for the ID of the locked widget. If you don't know how to find widget ID, then see this tutorial.
          • Then remove the line containing the ID and save it and you are done.

          Moving The Locked Gadget;

          • If you want to move it then you would have to change (locked="true") into (locked="false") in the same line and the save your template.
          • Then go to your layout and move it according to your wish and save it.
          Now, you are done deleting the locked widget.
          Happy Blogging!

          Using Post Title Instead Of Old And New Post

          You might have see older post and newer post link at the below part of each blog post. They are the links to the post publish a step earlier and later. Actually most of the people don't pay much attention to it as they don't attract much visitors.
          But by replacing the old post and new post text with their post titles, remaining the link same, we can attract much more visitors, as we've seen in Harry Potter where we're busy seeing the exploration of wonders of wizarding world!  
          This trick surely looks cool, isn't it. After all it's meant to be cool, hehe, just kidding. Now we shall move forward to accomplish this trick. Follow below;

          1. Adding Jquery Code;

          Before you implement this trick you will need to add a Jquery code. If you have already added this Jquery code while doing other blogger tricks then you don't need to add it again. Just skip it and go for next step. See below for how to add Jquery code;
          • Go to dashboard>Template>Edit Html.
          • Then in your template search for </head> tag and insert the below code just above </head>;
          <script type="text/javascript" src="http://ajax.googleapis.com/ajax/libs/jquery/1.4.4/jquery.min.js">
          </script>
          
          • Now, save your template and go for next step.

          2. Adding The JavaScript Code;

          This trick is only possible because of Javascript. We will need to add it. Follow below;
          • Go to you template code;dashboard>Template>Edit Html.
          • Then find for </body> tag and paste the below code  just above </body>.
          <script type='text/javascript'>
          //<![CDATA[
          $(document).ready(function(){ 
          var newerLink = $("a.blog-pager-newer-link").attr("href"); 
          $("a.blog-pager-newer-link").load(newerLink+" .post-title:first", function() { 
          var newerLinkTitle = $("a.blog-pager-newer-link").text(); 
          $("a.blog-pager-newer-link").text("<< " + newerLinkTitle); 
          }); 
          var olderLink = $("a.blog-pager-older-link").attr("href"); 
          $("a.blog-pager-older-link").load(olderLink+" .post-title:first", function() { 
          var olderLinkTitle = $("a.blog-pager-older-link").text(); 
          $("a.blog-pager-older-link").text(olderLinkTitle + " >>");//rgt 
          }); 
          }); 
          //]]>
          </script>
          
          • Now click on template and you are done.

          3. Styling The Posts Links;

          Sometimes it happens that your post name may be a bit more longer than usual, or you may like to change it's colour to suit your taste. If this is the case then;
          • Add the below CSS code to your blog;
          #blog-pager-newer-link  {
          font-size:85%;
          width:220px;
          background:#fafafa;
          } 
          
          #blog-pager-older-link {
          font-size:85%;
          width:220px;
          background:#fafafa;
          } 
          
          • You can directly edit the CSS above. Adjust according to your need and save it.